There are few things in life as comforting as the smell of freshly baked bread wafting through a kitchen. It evokes memories of grandmother’s house, cold winter days, and the simple joy of a warm slice slathered in butter. However, many home bakers are intimidated by the idea of making bread from scratch, fearing dense bricks or rock-hard crusts.
This recipe for Homemade Soft Crusty Bread is here to banish those fears. It is the “Goldilocks” of bread recipes—the inside is pillowy soft and fluffy, while the exterior boasts a golden, satisfying crunch. Best of all? It relies on basic pantry staples and doesn’t require a stand mixer or specialty bread flour. With just a little bit of patience, you can create bakery-quality loaves right in your own oven.
Why This Recipe Works
The magic of this bread lies in the balance of
ingredients:
· All-Purpose Flour: You don’t need bread flour. The protein content in standard all-purpose flour is perfect for a loaf that is tender but holds its shape.
· Instant Yeast: This is a game-changer for beginners. It doesn’t need to be activated in water separately; it can be mixed directly into the dry ingredients, saving time and preventing the risk of killing the yeast with water that is too hot.
· The Sugar & Salt Balance: Sugar feeds the yeast to help the dough rise, while salt adds flavor and strengthens the gluten structure.
The “Secret” to a Crusty Top
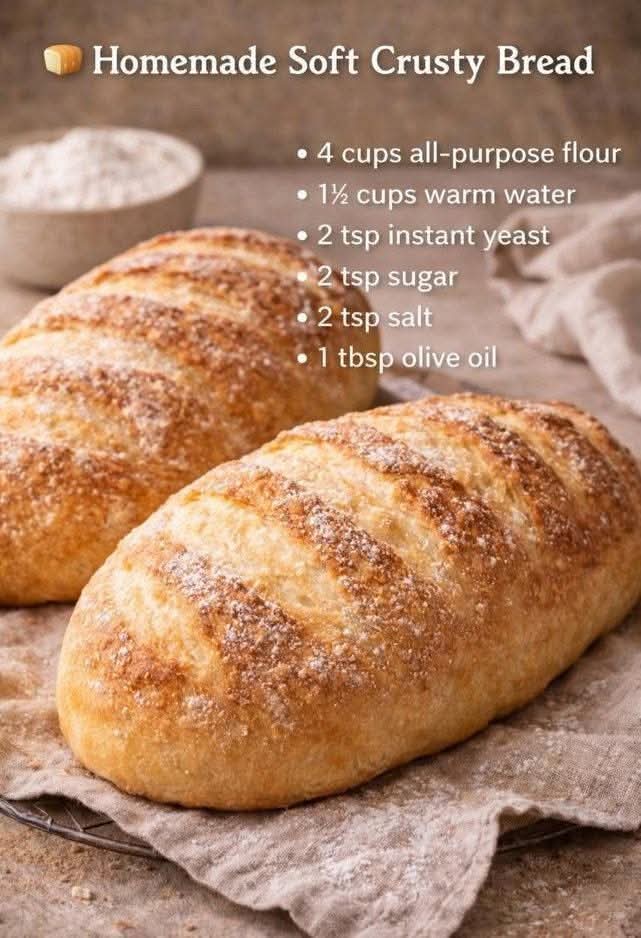
The beauty of these loaves, as seen in the image, is that rustic, flour-dusted, scored top. We achieve this by:
- Scoring: Using a sharp knife to slash the dough before baking allows steam to escape, helping the bread expand (called “oven spring”) rather than bursting at the seams.
- Steam: Baking the bread creates steam inside the oven, which keeps the crust soft during the first half of baking, allowing the bread to rise fully. As the steam dissipates, the crust hardens and crisps up.
The Recipe: Homemade Soft Crusty Bread
Prep time: 15 minutes
Rise time: 1.5 – 2 hours
Bake time: 25–30 minutes
Yield: 2 large loaves or 1 very large loaf
Ingredients
· 4 cups all-purpose flour (plus extra for dusting)
· 1 ½ cups warm water (aim for about 110°F/45°C – warm to the touch, but not hot)
· 2 tsp instant yeast
· 2 tsp sugar
· 2 tsp salt
· 1 tbsp olive oil
Instructions
- Mix the Dough
In a large mixing bowl, whisk together the flour, instant yeast, sugar, and salt. Make a well in the center and pour in the warm water and olive oil. Stir with a wooden spoon until a shaggy dough forms.
- Knead
Turn the dough out onto a lightly floured surface. Knead for about 8–10 minutes until the dough is smooth and elastic. If the dough is too sticky, add flour one tablespoon at a time. If it’s too dry, wet your hands slightly.
- First Rise
Place the dough in a lightly oiled bowl, turning once to coat the top. Cover with a clean kitchen towel or plastic wrap and let it rise in a warm place for about 1 hour, or until doubled in size.
- Shape
Punch down the dough to release air. Turn it out onto a floured surface. Divide the dough in half (if making two loaves). Shape each piece into a tight oval or round loaf by pulling the sides down and tucking them under.
- Second Rise
Place the shaped loaves onto a baking sheet lined with parchment paper or a silicone mat. Lightly dust the tops with flour. Cover and let rise for another 30–45 minutes.
- Prepare for Baking
Preheat your oven to 400°F (200°C). Place a metal pan or cast-iron skillet on the bottom rack of the oven (you will add water to this later).
Optional: For an extra crusty exterior, lightly brush the loaves with water or oil and sprinkle with a pinch of coarse salt or flour.
- Score the Bread
Using a sharp knife or a razor blade (lame), make 3–4 shallow slashes across the top of each loaf. This prevents the bread from tearing and looks professional.
- Bake
Place the baking sheet in the oven. Carefully pour about 1 cup of hot water into the preheated metal pan on the bottom rack to create steam. Quickly close the oven door.
Bake for 25–30 minutes, or until the loaves are golden brown and sound hollow when tapped on the bottom.
- Cool
This is the hardest part! Remove the bread from the oven and transfer to a wire rack. Allow it to cool completely before slicing. If you cut it while hot, the steam inside will escape and the texture will become gummy.
Serving Suggestions
This bread is incredibly versatile.
· Fresh: Serve warm with salted butter and honey.
· Savory: Use for grilled cheese, garlic bread, or dipping into olive oil and balsamic vinegar.
· Breakfast: Toast it and top with avocado and eggs.
Enjoy the process and the delicious results. Once you master this simple recipe, you’ll never look at store-bought bread the same way again.